Visual Style
Appearance Settings
The Appearance settings visual preferences changing the visual feel and appearance of various elements in the WavePlan workspace.
The Appearance section is where WavePlan becomes yours. This isn’t just about aesthetics—it’s about shaping the emotional atmosphere of your creative workspace. The visualizer responds to your audio in real time, turning technical analysis into a sensory experience. Pair it with your chosen accent color, and you create a cohesive visual language that supports your focus, mood, and workflow rhythm.
- Your Personal Preference
- Appearance settings are personal preferences. Changes apply instantly to your session and persist across devices. Collaborators in shared workspaces see their own Appearance settings—not yours. Use the Control Bar to adjustments some appearance settings during your session;
How to Change Your Appearance Settings
From the Settings Screen
- 1 From the WavePlan Folder Drawer, click Settings.
- 2 In the Settings menu, select Appearance.
From the Control Bar
- 1 From the WavePlan Control Bar, click the visualizer tool.
- 2 Choose the visalizer and accent color on-the-fly.
- Quick Access
- While the appearence settings documentation provides the full description of each visualizer style and accent option, you can also switch your Visualizer or Accent Color on the fly from the Control Bar. Changes made there are saved as if you were making the change from within the Appearance Settings view.
Visual Style
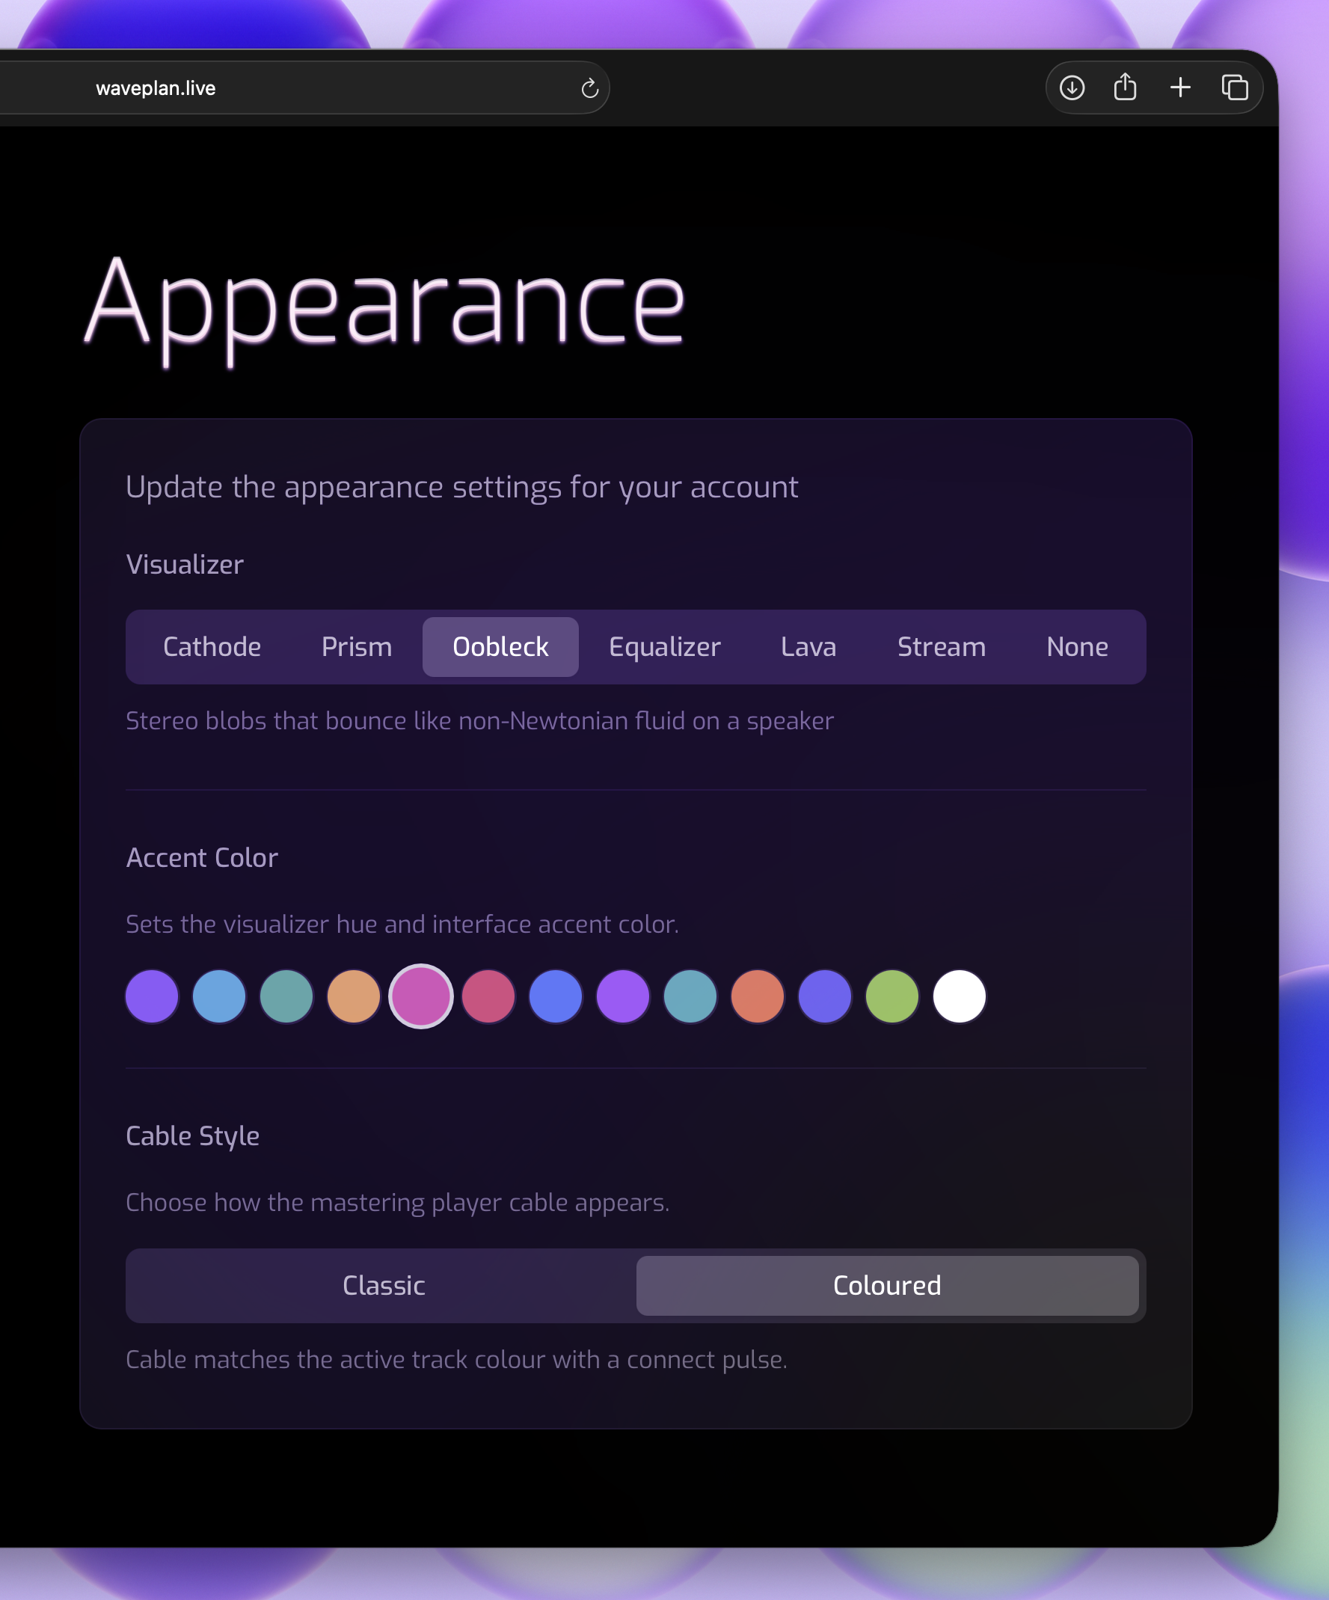
Background Visualizers
Choose the background visualizer that best matches how you feel while you work. Each style interprets the audio spectrum through a distinct emotional lens.
Cathode
- Warm CRT tube glow with subtle static grain
- Evokes the intimate hum of vintage studios and late-night sessions. The soft phosphor glow and gentle noise floor create a nostalgic, grounded atmosphere—ideal when you want to feel connected to the history of sound.
Prism
- Radial spectrum bands with prismatic reflections
- Clean, precise, and luminous. Prism breaks frequency data into crystalline bands that refract like light through glass. Use this when you want clarity, structure, and a sense of technical elegance.
Oobleck
- Stereo spreading blob that bounces like non-Newtonian fluid on a speaker
- Playful, unpredictable, and tactile. Oobleck reacts to transients with bouncy, viscous motion—solid on impact, fluid in release. Perfect for creative exploration or when you need to lighten the mood during long sessions. It's great for visualizing stereo spread.
Equalizer
- Stereo bars that rise and fall with rhythmic precision
- Classic, confident, and direct. Equalizer translates frequency energy into vertical motion you can read at a glance. Choose this when you want immediate visual feedback without decorative flourish.
Lava
- Slow morphing lava lamp blobs that pulse with the music
- Hypnotic, organic, and meditative. Lava flows in slow, warm undulations that mirror the emotional arc of your track. Ideal for mastering, reflective listening, or when you need to stay present with the music’s body.
Stream
- Caustic water light with gentle ripples
- Calm, fluid, and expansive. Stream renders audio as light dancing through moving water—subtle, refreshing, and deeply soothing. Use this to reduce visual fatigue during extended editing or planning sessions.
Choosing None Removes all background motion so your attention stays entirely on waveforms, annotations, and metrics. Choose None when you need zero visual distraction.
Visual Style
Accent Colors
Your accent color is the visual heartbeat of WavePlan. It tints interactive elements, highlights selections, and—importantly—modulates the visualizer’s palette so the entire interface moves as one cohesive system.
Ten colors are available for annotations, plus white for a monochrome look. The color is displayed on Cue Overlays and Cue Markers, and used in the Emerging Ideas visualization. Violet is the default and pairs intentionally with most visualizer styles. Cooler accents (Cyan, Teal, Emerald) enhance Prism and Stream; warmer accents (Amber, Rose, Orange) complement Cathode and Lava. Experiment to find the combination that helps you stay in flow.
Track Colors vs. Accent Colors
It’s important to distinguish two layers of color in WavePlan:
- Global Accent Color - set here in Appearance: Controls UI highlights, button states, and visualizer tinting across the entire application.
- Track Colors - set per track on the timeline: Affect only that track’s waveform, jack icon, annotation tints, Integrated Player pill, and associated task markers in the Plan Sidebar.
Assigning a color to a track creates a visual thread that follows that audio through every context—timeline, player, annotations, and planning tasks. Use this to group related revisions, highlight reference material, or simply make your workspace more intuitively scannable.
Visual Style
Cables
Cables are a visual tether showing you exactly which audio source is feeding the integrated player.
When a track is selected, a cable plugs into its jack and runs down to the player, creating a clear signal path you can follow at a glance. The cable isn’t decorative—it’s functional. Pull the cable from the player to disconnect the audio source, just like unplugging a patch cable in a physical studio. This gesture ejects the track from the player, giving you a direct, intuitive way to clear your listening space.
Black Cables
- Cables render in a neutral black line
- Black cables provide clear connection feedback without adding chromatic information. Use this when you want the functional clarity of visible cables but prefer a more minimal, monochrome aesthetic. Black cables keep the focus on your audio and annotations.
Colorful Cables
- Cables inherit the color of their source track
- Colorful cables create a continuous visual identity from waveform to player. This is the most informative option—if you’re using track colors to organize revisions, references, or stems, the cable extends that coding into the transport layer. Ideal for complex sessions with multiple active tracks.
Secret Cables
- There are no cables (Shhhh!)
- The connection between track and player still exists functionally. The jack icon indicates the active source, and the Player Bar shows the track pill, but the visual patch line is removed. Choose Secret Cables when you are feeling too serious and important to have any fun.
Library
Commercial References
Commercial references are professionally released tracks that you upload to your Library and flag as reference material.
Unlike standard uploads — your own mixes, stems, or work-in-progress files — commercial references serve as loudness, tonal, and arrangement benchmarks for comparison against your work.
How They Differ from Standard Uploads
- Standard Upload
- Your own audio — mixes, masters, stems, demos. Visible to everyone in a shared workspace. Used as primary working material on the timeline.
- Commercial Reference
- A professionally released track used as a benchmark. When uploaded by a provider, commercial references are hidden from clients in shared workspaces. They can be used for A/B comparison and gain-staging during mastering.
Flagging a File as a Commercial Reference
Open the Library sidebar tab. Click the ⋮ menu on any file and toggle the Commercial Reference checkbox. The flag also sets the reference track theme for the file in your library.
Library
Managing A Growing Library
Your library will grow — that's the point. WavePlan is designed to be your reference vault, not a temporary scratchpad. The goal is organized completeness: everything findable, nothing lost, and your active workspace stays focused on what matters now.
The details of how to manage that growth are covered in the sections below. This page ties them together so you know where to look when the time comes.
Where to Find What You Need
Library management in WavePlan isn't a single page — it's a workflow that spans several sections, each addressing a different aspect of growth:
-
Plan status as a retention dial
Use Active, Complete, and Archived statuses to keep your workspace clean without losing access to past work. See Managing Plans for the full retention workflow, including tips on when to archive, how to audit tracks before deletion, and why search often beats deletion.
-
Commercial reference protection
Flagged references are never deleted automatically — even when a Plan is removed. They survive across plans and into the future. See Commercial References for how flagging works, and Shared Workspaces for visibility rules in collaborative contexts.
-
Storage quota and cleanup
Every account includes free storage, with larger allowances on paid plans. If you're approaching your limit, the Storage section covers pruning references, checking orphaned files, and upgrading your plan.
-
Backing up your library
Request a full backup of your audio library at any time from Settings. See Data & Backup for how backups work, download expiry, and rate limits.
- Your library is designed to grow
WavePlan doesn't force you into constant cleanup mode. With status-based organization, protected references, and search that works across all statuses, your library stays manageable no matter how large it gets.
Drive
Drive Overview
Drive is the central hub for your WavePlan file library. It replaces the old Settings menu item with a dedicated space for browsing, managing, and organising your audio files — with settings now accessible via a cog icon alongside it.
Click Drive in the WavePlan navigation to open the file browser at /drive/. The settings cog beside it opens the WavePlan settings panel.
What's in Drive
-
File Browser — Browse, upload, download, and organise all files in your WavePlan library.
-
WaveDrive Files — Files synced by WaveDrive from your Mac appear here automatically, organised by the sync folder's type.
-
Storage Usage — A summary of your current library storage, quota, and file count.
Drive vs. Music Library
The Drive file browser shows all files in your library in a flat or folder view — it's your raw file store. The Music Library sidebar in the workspace presents a curated, type-organised view of the same files, filtered and grouped by folder type, project, and annotations. Both views draw from the same underlying library.
Use Drive when you want to manage files directly. Use the Music Library sidebar when you're working inside a Plan and want context-aware access to your audio.
Drive
File Browser
The File Browser gives you direct access to every file in your WavePlan library. Browse, search, upload, download, and manage files without leaving WavePlan.
Open the file browser by clicking Drive in the WavePlan navigation. The default view lands at /drive/ and shows your complete library.
Browsing Your Library
Files are grouped by their source Folder Type: Audio, Bounces, and Commercial References each appear as a top-level section. Within each section, files are sorted by upload date descending, with the most recent at the top.
Switch between List and Grid view using the toggle in the toolbar. The search bar filters by file name across your entire library in real time.
Uploading Files
Click Upload in the toolbar to upload files directly from your browser. Drag and drop files onto the browser area for a faster workflow. Uploaded files appear immediately in the relevant folder type section. For automated uploads from your Mac, use WaveDrive instead.
Downloading Files
Click any file to open its detail panel, then click Download to save it to your Mac. You can also download multiple files at once by selecting them with the checkbox and clicking Download Selected in the bulk action bar.
Organising and Deleting
Rename, move between folder types, or delete files from the file detail panel or the bulk action bar. Deleting a file from Drive removes it permanently from your WavePlan library. If the file was synced by WaveDrive, it is not deleted from your local Mac — WaveDrive does not propagate library deletions back to disk.
Drive
Drive Settings
WavePlan settings are accessed via the cog icon next to the Drive navigation item. This keeps the full settings panel one click away without occupying a primary navigation slot.
Opening Settings
Click the ⚙ icon next to Drive in the WavePlan navigation to open the Settings panel. The same panel was previously accessed by clicking the Settings menu item directly — only the entry point has changed, not the settings themselves.
Settings Sections
-
Account — Manage your WavePlan profile, email, and subscription.
-
Device Linking — View and revoke linked devices including WaveDrive, browser sessions, and VST plugins.
-
Appearance — Theme, density, and display preferences.
-
Notifications — Configure email and in-app notification preferences.
-
Privacy & Security — Data export, account deletion, and session management.
Device Linking from Settings
The Device Linking section in Settings is where you manage all external connections to your WavePlan account — including WaveDrive installations, browser links, and VST plugin authorisations. See the Device Linking documentation for full details.
Drive
Wavedrive Files In Library
Files synced by WaveDrive appear automatically in your WavePlan Music Library sidebar — no manual import required. The library organises them based on the Folder Type configured in WaveDrive.
As soon as WaveDrive uploads a file, it becomes immediately available in the Music Library sidebar within any open Plan.
How Files Are Organised
WaveDrive sync folders are assigned a Folder Type when created. WavePlan uses this type to route files into the appropriate Music Library section:
Audio
Appears under Library → Audio. Generic stems, samples, and recordings available for drag-and-drop into any Plan.
Bounces
WavePlan auto-associates Bounces with the matching Plan by filename convention. They appear in the Plan's Versions panel for direct comparison and annotation.
Commercial References
Appears under Library → References, available as a reference track in any Plan without re-importing.
WaveDrive Badge
Files originating from WaveDrive are shown with a small WaveDrive badge in the Music Library and Drive file browser. This makes it easy to distinguish automatically synced files from manually uploaded ones.
For full details on how WaveDrive syncs files to WavePlan, see the WaveDrive documentation.
Project Management
Playing Through Your Plan
Play Through is your verification step — a guided walkthrough that steps through every action item in your plan sequentially, navigating the playhead to each annotation's time position so you can review it in audio context before moving on.
It bridges the gap between planning and doing. Instead of reading a list of notes and manually hunting for each one on the timeline, Play Through does the navigation for you — leaving your attention free for listening and decision-making.
For an overview of how Play Through fits into the broader project workflow, see Your Project Workflow above.
How Play Through Works
-
1
Open the Plan tab in the Sidebar.
-
2
Optionally filter by Todo to focus on pending items only.
-
3
Click the Play button at the top of the action items list.
-
4
The timeline scrolls to each item's position in sequence, letting you review the audio in context before advancing to the next item.
When to Use Play Through
-
Pre-DAW verification
Before opening your DAW session, step through every annotation to confirm you've captured the right decisions. This is your final sanity check — if it's not on the list, it doesn't get done.
-
Client review preparation
Walk through your plan's action items to ensure every client request has been addressed. Combine with the Activity feed to confirm when each item was actioned.
-
Session handoff
Before handing a plan to a collaborator, Play Through ensures every annotation is clear and positioned correctly — reducing ambiguity in the handoff.
- Combine with filters
Filter the Planning Sidebar to Todo items first, then Play Through — this skips completed items and focuses only on what still needs attention.
Project Management
Managing Plans
From a project manager's perspective, Plans are more than workspaces—they're the unit of accountability in your studio workflow. Each Plan represents a client engagement, a revision cycle, or a creative phase. Managing them well means balancing accessibility with archival integrity: keeping what matters reachable, while preventing your active list from becoming unmanageable.
This section covers the lifecycle of Plans; how to create, organize, filter, and retire them—so your growing library stays intentional, not accidental. For an overview of how Plans fit into the broader project workflow, see Your Project Workflow above.
The Plan Lifecycle: Status as Workflow State
WavePlan uses three status flags to help you mentally and visually separate work in progress from work that's done:
| Status | Purpose | Best For |
|---|---|---|
| Active | Work currently in motion | Sessions you're actively editing, annotating, or sharing with clients | |
| Complete | Finished but frequently referenced | Delivered projects you may revisit for revisions, stems, or client requests | |
| Archived | Long-term storage, out of the way | Legacy work, test sessions, or completed engagements you rarely need |
- Key principle
- Status changes are non-destructive and reversible. Moving a Plan to *Archived* doesn't delete data—it simply hides it from the default view. Use this to declutter your active workspace without losing access to historical context.
- Workflow Tip
Treat *Complete* as your `delivered but warm` tier. Keep client projects here for 6–12 months post-delivery; move to *Archived* once the revision window closes.
Creating Plans Intentionally
A new Plan is created instantly via the **New Plan** button in the Folder Drawer. But naming and scoping it thoughtfully pays dividends later:
- Name for searchability
- Use consistent patterns like `ClientName_ProjectType_Date` (e.g., `AcmeCo_EP_Mastering_2026-03`) to make filtering and retrieval predictable.
- One Plan per decision boundary
- Create separate Plans for distinct phases (e.g., `Mix_v1_Review`, `Mix_v2_ClientFeedback`) rather than overloading a single Plan with unrelated revisions.
- Set status at creation
- If you're creating a reference-only Plan (e.g., for commercial benchmarks), consider setting it to *Archived* immediately to keep it out of active rotation.
Finding Plans: Filtering and Search
As your library grows, the Folder Drawer's filtering and search tools become essential for maintaining orientation.
Status Filtering
The status filter dropdown (labeled `A/C` by default) lets you toggle visibility of:
- Active: A
- Active Plans are shown by default.
- Complete: C
- Complete Plans are shown by default.
- Archived: X
- Archived Plans are hidden by default.
Name Based Search
The search field filters Plans in real time by name, across *all* status groups—even if a status is currently hidden. Search by client name, project code, or date to locate a Plan without adjusting filters. Partial matches work too (e.g., `Acme` finds `AcmeCo_EP_Mastering_2026-03`).
- Daily workflow tip
Keep Archived hidden during daily work to reduce cognitive load. Enable it temporarily when auditing client history or preparing deliverables from past sessions.
Deleting Plans: What Happens to Your Data
Deleting a Plan is a permanent, irreversible action. Before proceeding, understand the cascade:
-
1
Commercial References are always kept A flagged reference file is only ever deleted manually to ensure you have access to references across plans and into the future.
-
2
The Plan container is removed All annotations, task lists, activity history, and timeline arrangements tied to that Plan are permanently deleted.
-
3
Tracks are deleted if not reused If an audio file is *only* used by the deleted Plan, it is removed from your Library and storage quota is freed. If the file is referenced by *any other Plan* (even an Archived one), it remains in your Library untouched. Note that this does not apply to commercial references, they stay in your library.
By treating Plan status as a workflow signal—not just a label—you turn your Folder Drawer into a living project dashboard. Everything stays findable, nothing gets lost, and your active workspace remains focused on what matters *now*.
-
1
Use Status as a Retention Dial
-
Active: Limit to 3–5 Plans max. This is your "now" workspace
-
Complete: Your primary reference archive. Keep delivered projects here for easy access during revision windows
-
Archived: Your deep storage. Move projects here once the engagement is closed and the revision period has elapsed
-
-
2
Leverage Search Over Deletion
Because search works across all statuses, you rarely need to delete a Plan to find what you need. A well-named Plan in *Archived* is just one search away.
-
3
Audit Tracks, Not Just Plans
Before deleting a Plan, check the Library to see if its tracks are reused elsewhere. If a track is a unique stem or client deliverable, consider:
-
Moving it to a dedicated "Assets" Plan before deletion
-
Downloading a local backup via the track's download button
-
Flagging it as a Commercial Reference if it serves as a benchmark
-
-
4
Document Your Retention Policy
For client work, establish a simple internal policy:
-
Client Plans remain in Complete for 12 months post-delivery, then move to Archived
-
Tracks are retained indefinitely unless explicitly requested for removal by the client
This protects you legally, sets clear expectations, and reduces decision fatigue when cleaning up.
-
-
5
Monitor Storage Quota Proactively
The Storage section in Settings shows your usage. If you're approaching your limit:
-
Review Archived Plans for large, unused reference files
-
Remove duplicate uploads (same file added to multiple Plans unnecessarily)
-
Consider upgrading storage *before* you're forced to delete under pressure
-
Project Management
Activity As Accountability
WavePlan's Activity feed turns your implicit workflow into explicit history. Every significant event in a Plan is logged automatically — who did what, and when — giving you a reliable audit trail you can reference weeks or months later without relying on memory.
This isn't time tracking. It's accountability infrastructure. For producers managing revision cycles, mastering engineers reconstructing decision paths, or collaborators handing off work, the Activity feed answers the question that always comes back: what changed, and when?
For the full feature breakdown of the Activity Sidebar (accessing the tab, event types, overview summary), see Activity Tracking under Sidebars.
Why Activity Matters for Project Management
When you're managing real projects — not just experimenting — you need more than a list of tasks. You need a record of what happened between sessions, who made changes, and whether the work is progressing as expected. The Activity feed provides that record without requiring any manual input.
-
Revision Auditing
Review the sequence of version uploads and annotation edits to reconstruct decision paths between client feedback rounds. No more "I thought we agreed on the vocal level — when did that change?"
-
Collaboration Transparency
In shared workspaces, see which team member added a note or changed a status. Reduces ambiguity in handoffs and ensures everyone can account for their contributions.
-
Session Reconstruction
Return to a Plan after a break and scroll the Activity feed to refresh your memory on what was adjusted since your last session. Your context is preserved even when your recollection isn't.
-
Client Reporting
Export or screenshot the Activity list with timestamps to demonstrate progress, changes made, or time invested in planning phases. Proof of work, not just claims of effort.
Combining Activity with the Planning Sidebar
The real power emerges when you use Activity alongside the Planning Sidebar. Together, they give you both the what needs doing and the what's been done — a complete picture of your project's state at any moment.
-
Filter Plan to Todo ‐ See only pending action items in the Planning Sidebar.
-
Cross-reference with Activity ‐ Check the Activity feed to confirm when and by whom each annotation was created or edited.
-
Use Play Through to verify ‐ Step through the remaining items with Play Through and mark them off as you confirm each one.
- Automatic logging
Every event is recorded without manual input. The Activity feed is always accurate because it requires no effort to maintain — just open it when you need it.
Account Management
Profile
Manages your identity within WavePlan.
Your display name and email address determine how you appear to collaborators in shared workspaces, how you’re credited in activity logs, and where critical account notifications are delivered.
Updating Your Email Address
Your email address serves as your login credential and the primary contact for account security, billing receipts, and backup deliveries. Changing it triggers a verification workflow to protect your account.
- 1 If you are currently viewing the main WavePlan screen, open the Folder Drawer and click the Settings link in the header to navigate to the Settings screen.
- 2 Navigate to Settings → Profile.
- 3 Click into the Email field and enter your new address.
- 4 Click Save. WavePlan will immediately send a verification link to the new email.
- 5 Open your inbox (check spam/junk if needed) and click the verification link.
Important: Changing your email automatically clears your previous verification status. You must verify the new address to restore full account functionality. If you’ve lost access to your old email, updating it here is the recommended way to regain secure access to your account.
Account Management
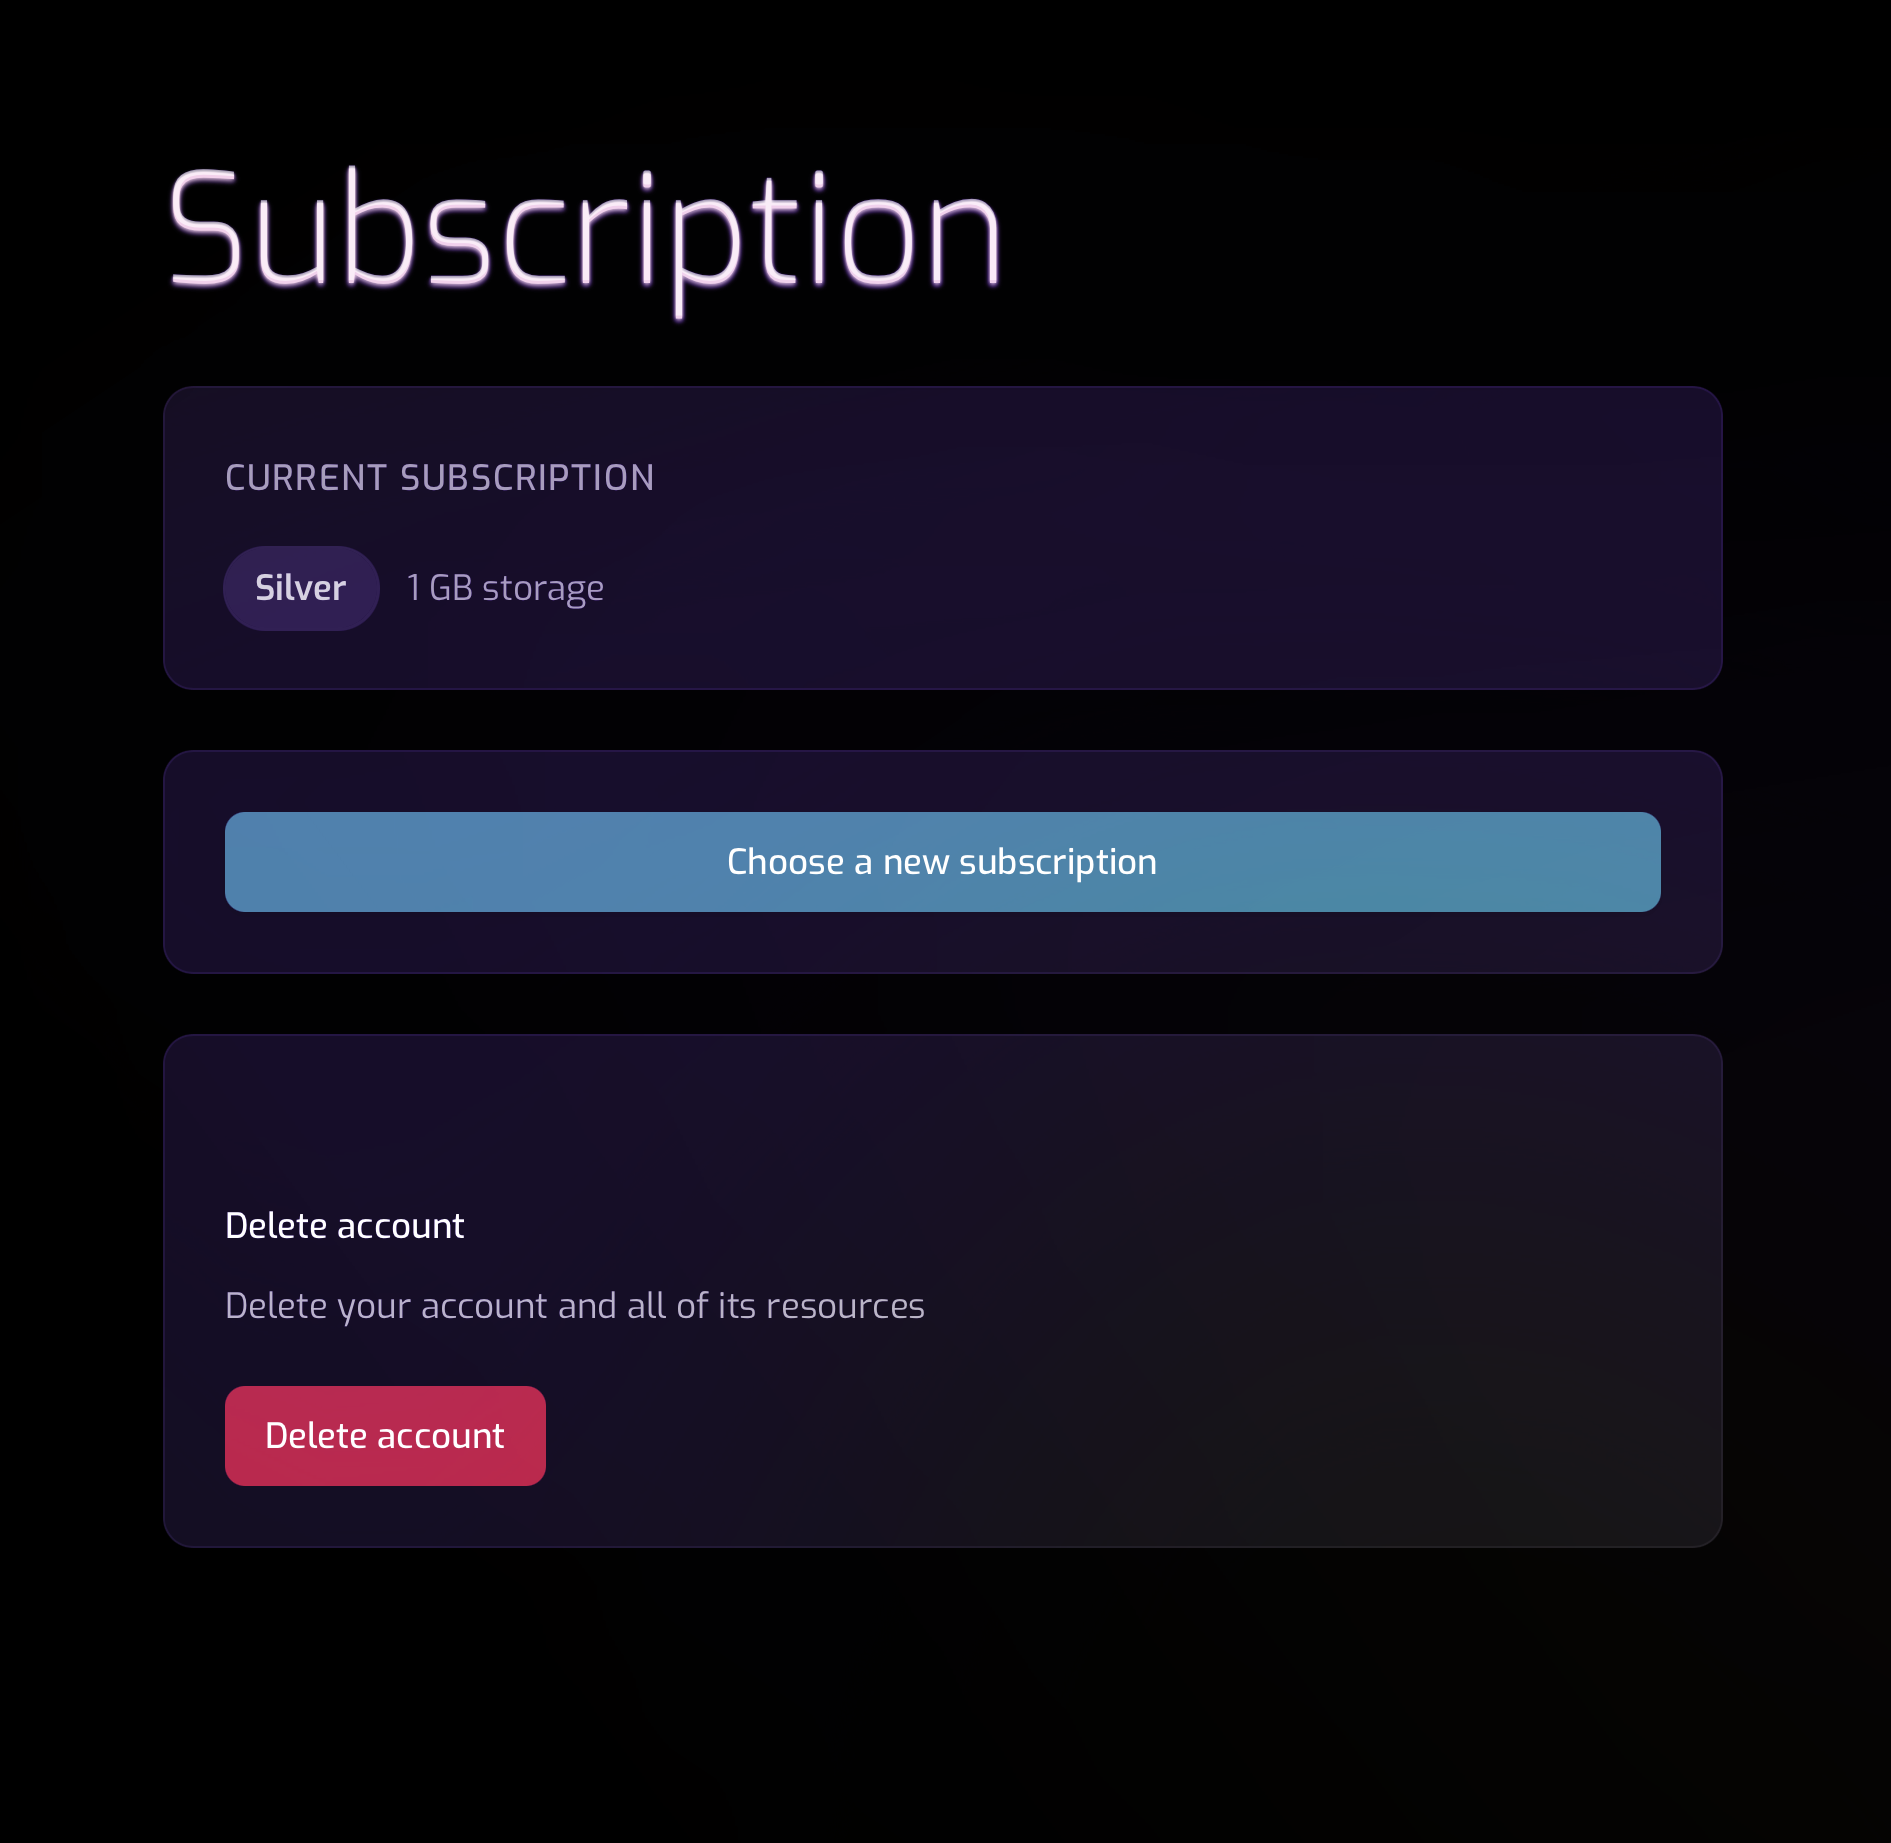
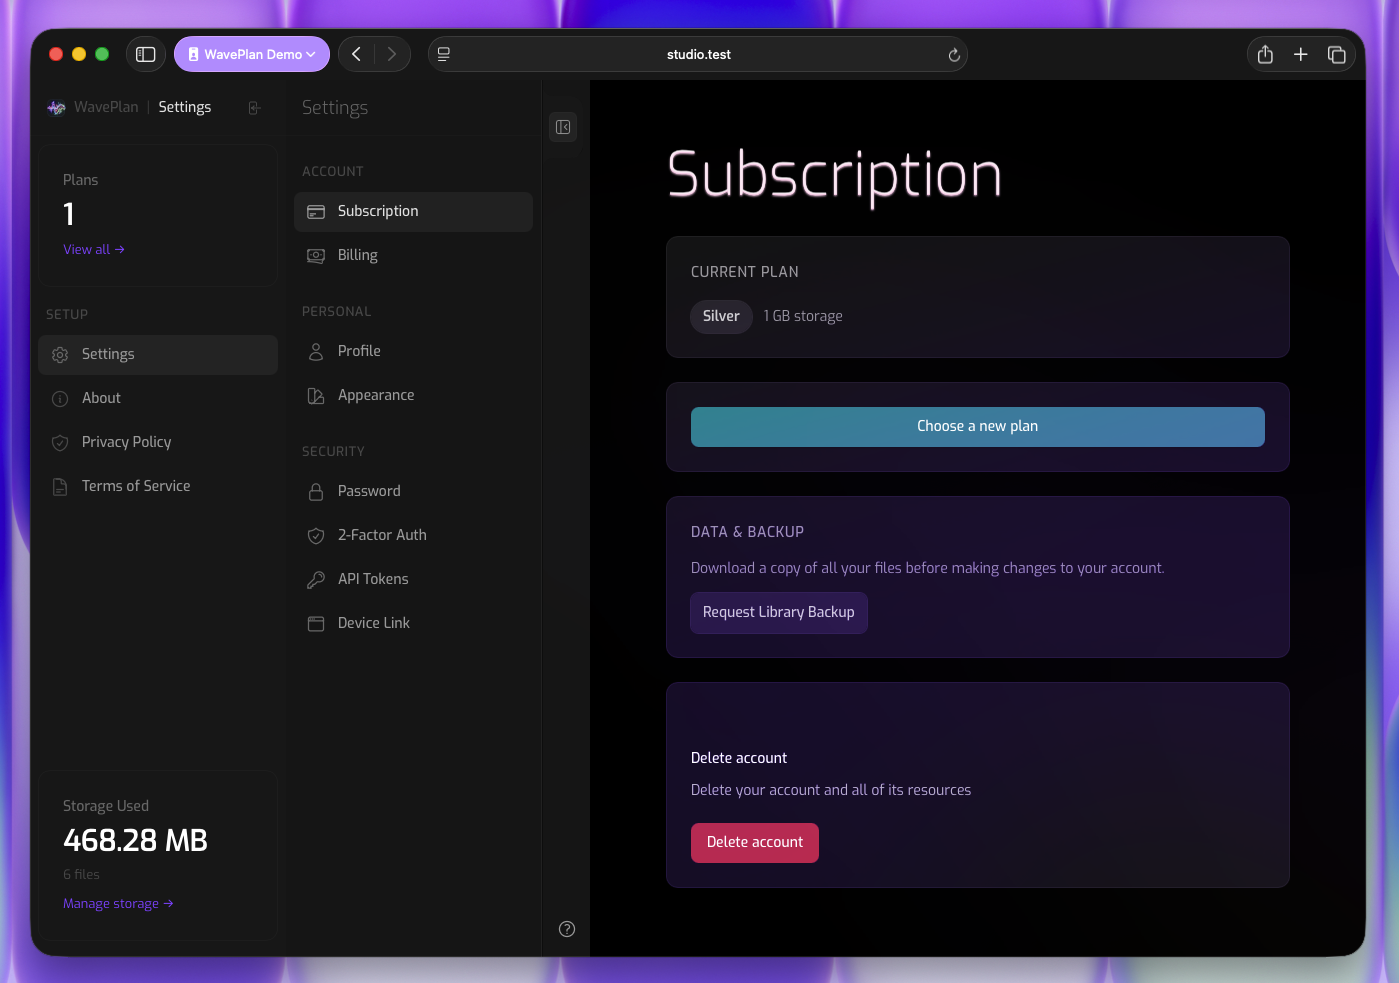
Manage Your Subscription
Manage your subscription level and choose the storage tier to match your workflow needs. Every account starts with the Silver tier (1 GB free, forever). When you need more space, you can upgrade to a higher tier at any time—changes take effect immediately.
Every WavePlan account starts on the Silver plan with 3 GB of free storage. This is a lifetime free tier — you will always have access to WavePlan at no cost. When you need more space, larger storage plans are available in-app through your subscription settings.
View Your Current Subscription Level
- 1 If you are currently viewing the main WavePlan screen, open the Folder Drawer and click the Settings link in the header to navigate to the Settings screen.
- 2 Navigate to Settings → Subscription from the Settings folder drawer.
- 3 Your current tier appears at the top and shows your included storage allowance.
Modifying Your Subscription
- 1 If you are currently viewing the main WavePlan screen, open the Folder Drawer and click the Settings link in the header to navigate to the Settings screen.
- 2 Navigate to Settings → Subscription from the Folder Drawer.
- 3 Click Choose a new subscription to open the tier comparison view.
- 4 Select the storage tier that fits your needs and confirm your choice.
- 5 If upgrading, you’ll be prompted to confirm payment details via Stripe. Changes apply immediately; prorated charges or credits are handled automatically.
Note: Downgrading to a lower tier is only available if your current library usage fits within the new tier’s storage limit. If you’re over the limit, you’ll be prompted to remove files or upgrade instead.
Account Management
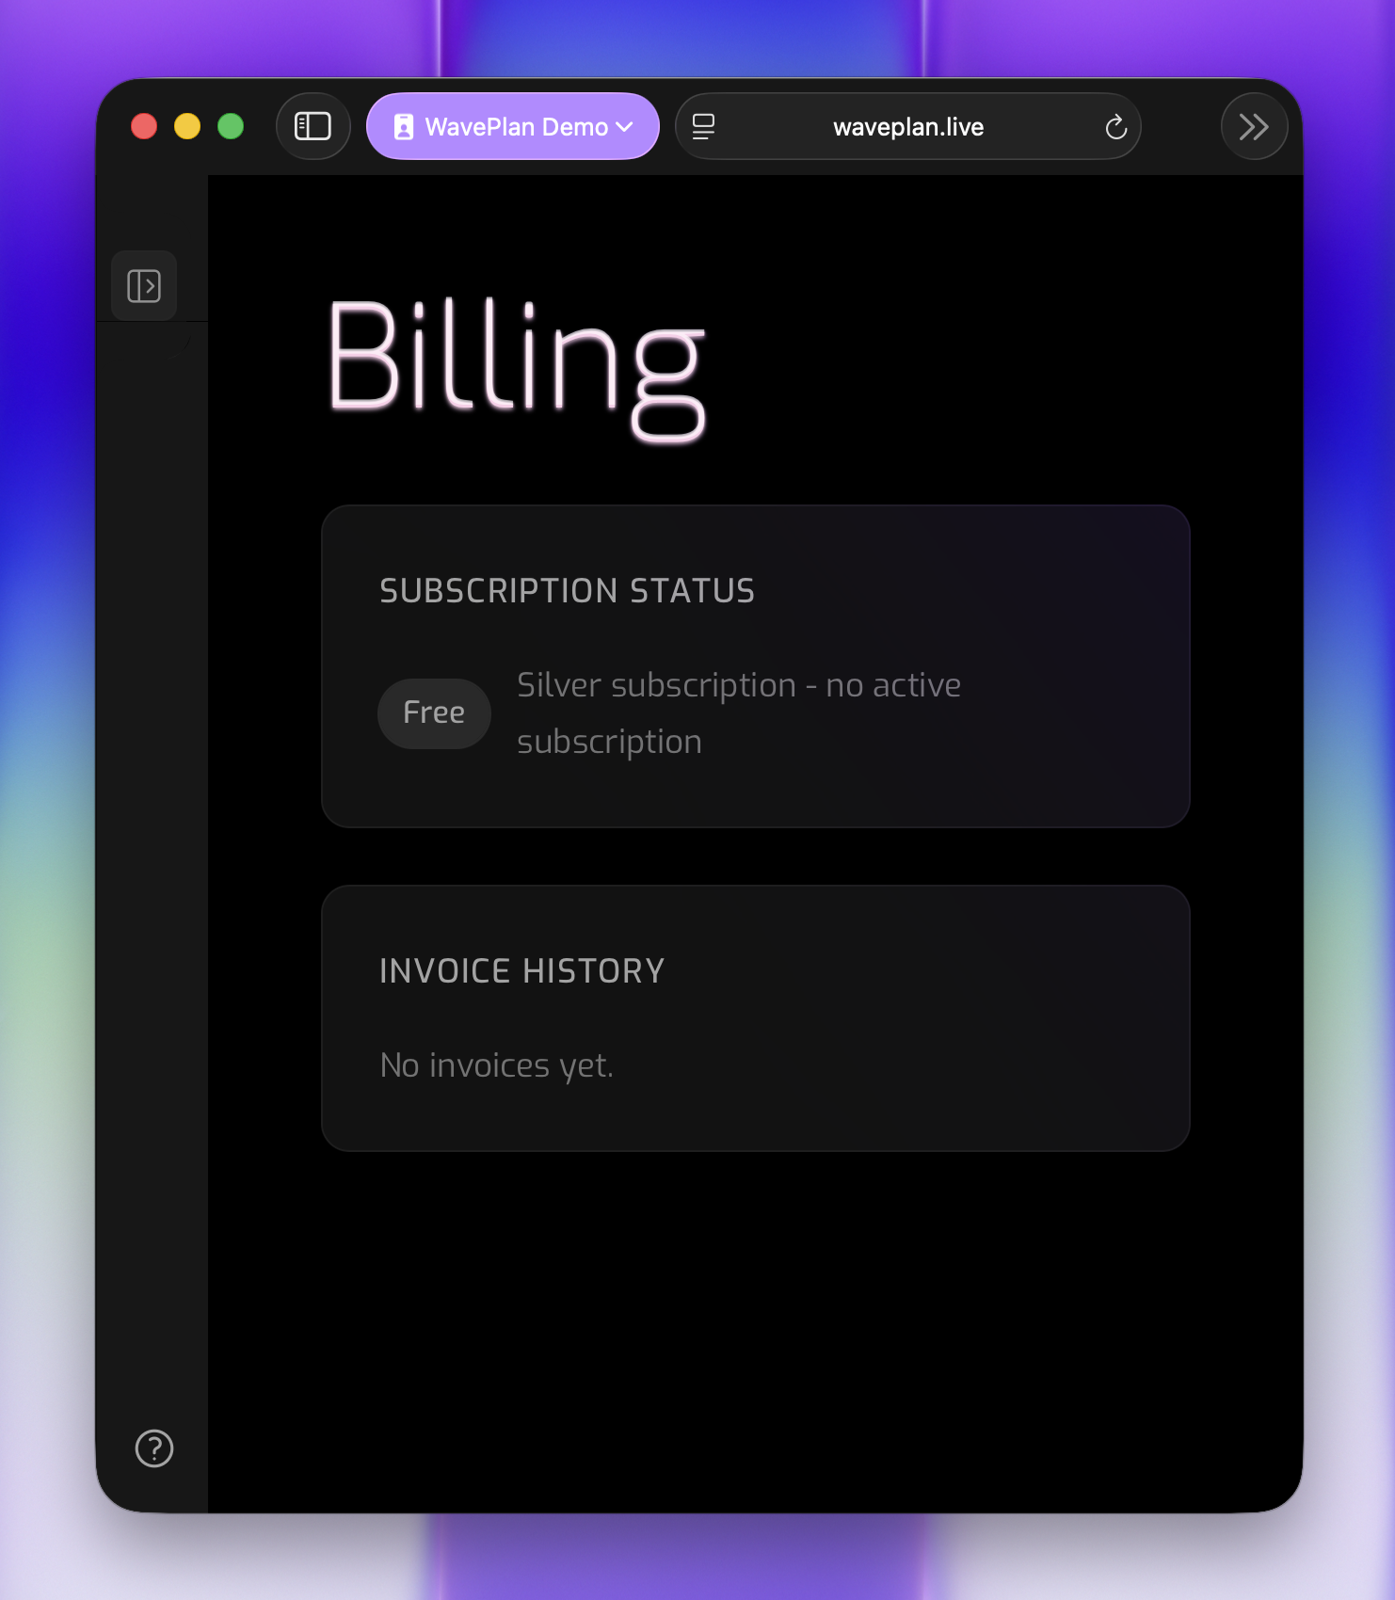
Billing
Manage your payment methods and invoice history. All transactions are processed securely through Stripe. You can update your card details, view past invoices, and download PDF receipts for accounting or tax purposes.
Update Payment Method
- 1 If you are currently viewing the main WavePlan screen, open the Folder Drawer and click the Settings link in the header to navigate to the Settings screen.
- 2 Navigate to Settings → Billing from the Settings folder drawer.
- 3 Under the Billing heading, locate Payment method.
- 4 Click Manage Billing to open the Stripe customer portal.
- 5 Add or replace your card details in the secure Stripe interface.
- 6 Close the portal—your new payment method is saved automatically and will be used for future renewals.
View and Download Invoices
- 1 If you are currently viewing the main WavePlan screen, open the Folder Drawer and click the Settings link in the header to navigate to the Settings screen.
- 2 Navigate to Settings → Billing from the Folder Drawer.
- 3 Scroll to the Invoices table under Billing.
- 4 Each row shows date, amount, and payment status.
- 5 Click the PDF link next to any invoice to download your receipt.
- Refunds & Disputes
- Billing inquiries are handled by real humans during Australian business hours (AEST). Contact support@themixbus.com.au for assistance.
Account Management
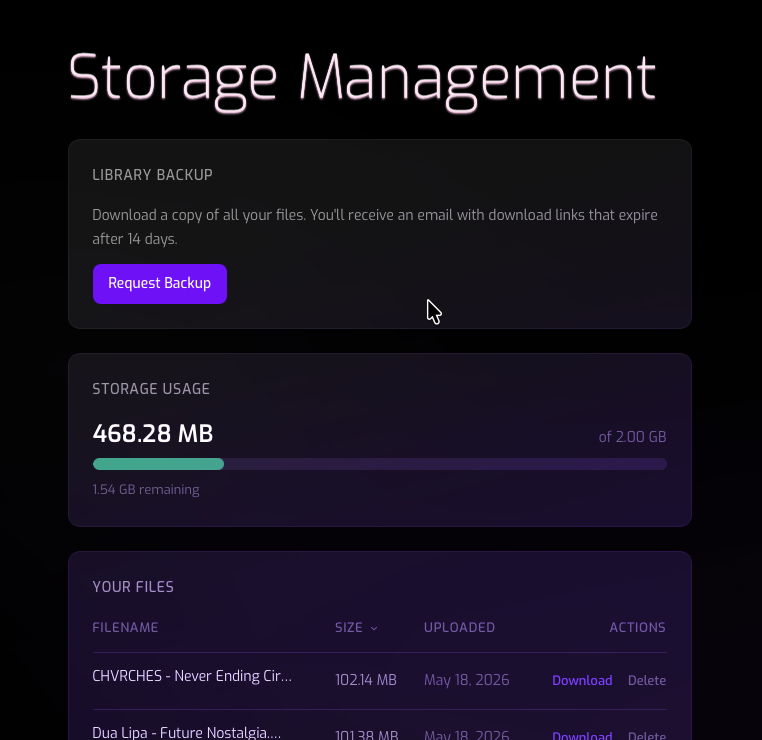
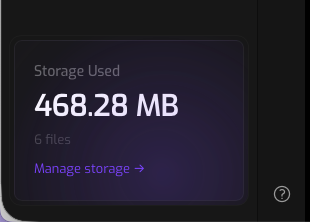
Storage
Every WavePlan account includes 3 GB of free storage on the Silver plan. Paid plans include larger storage allowances. You can monitor your usage and manage your storage from Settings.
Subscription Storage Quota
If you exceed your storage allowance, WavePlan will ask you to resolve the situation before you can continue using the rest of the application. Your existing files are never deleted automatically — you always remain in control of your data.
- Payment issue
- Your subscription has lapsed or a payment has failed, and your stored files exceed the free 3 GB limit. You can resolve this by fixing your payment method, switching to the free Silver plan (if your files fit within 3 GB), or closing your account.
Keeping Within Your Free Tier Subscription
The Silver plan is free forever with 3 GB of storage. To make the most of it:
- Monitor Usage — Keep an eye on your usage from the storage meter in Settings. If it's getting close to the quota you can remove archived plans.
- Prune References — Remove commercial references you no longer need from the Library to reclaim space.
- Orphaned Audio Files — Each file in the library has a context ⋮ menu. Open the context menu and you will see the file's usage across your plans. Check which plans still reference a file before deleting it.
Account Management
Data Backup
WavePlan lets you download a complete backup of your audio library at any time. You can also request an export of your personal data before closing your account.
Request a full backup of every audio file in your library. The system packages your files into downloadable ZIP archives and emails you the download links when they’re ready.
-
- 1 From the WavePlan folder drawer, navigate to Settings. At the bottom of the settings folder drawer click on Manage Storage to open the storage management page.
- 2 Click Request Backup — The backup is prepared in the background — this may take a while for large libraries
- 3 You’ll receive an email with download links once it’s ready
What happened to my backup?
If you're having trouble locating a backup or aren't sure where your backup has gone, please read the following points before contacting support:
- Download Expiry — Download links are valid for 14 days after your backup is ready. After that, the files are automatically cleaned up.
- Large libraries — The backup is prepared in the background which can take some time for large libraries
- Rate limit — You can request one backup per 24 hours. If a backup is already in progress, the button will be disabled until it completes.
Please contact our support team if you have any questions or concerns.
Information About How WavePlan Stores Your Data
For details on how your data is stored, retained, and processed, please refer to the Privacy Notice and Terms of Service.
Account Management
Deleting Your Account
Learn how to delete your account and what happens to your data.
Permanently Delete Your Account and All Account Data
At the bottom of the subscription section, a Delete Account button lets you permanently close your account. Before proceeding, consider downloading a backup of your library first.
What happens when you delete your account
- 1 A data export of your profile, plans, and storage summary is prepared
- 2 Your Stripe subscription is cancelled immediately (if active)
- 3 All uploaded files, plans, annotations, and account data are permanently removed
- 4 A farewell email is sent to your address with a JSON attachment containing your exported account data
Important: Account deletion is irreversible. You cannot delete your account if you have an outstanding balance on your Stripe account — settle any balance first. If you previously requested a library backup, those download links remain active for their full 14-day window even after your account is closed.
Data Retention On Account Deletion
When you delete your account, WavePlan automatically prepares an export of your personal data and emails it to you as a JSON attachment. This farewell email includes your profile information, plan details, and a storage summary — so you always have a record of what was in your account. If you requested a library backup before deleting your account, those download links remain active for their full 14-day window. We recommend downloading your backup before closing your account to ensure you have your files.
For full details on data retention, see the Terms of Service and Privacy Notice.
Privacy & Security
Security Overview
Protecting your account is our top priority, and this section provides the tools and guidance you need to keep your data safe. Below, you’ll find step-by-step instructions for setting a strong password, enabling Two-Factor Authentication (2FA), linking trusted devices, and managing API tokens.
In addition to these user-controlled settings, our platform includes proactive security monitoring to keep you informed. You will automatically receive an email notification whenever a login is detected from a new or unrecognized IP address. These alerts are designed to help you quickly spot and respond to potential unauthorized access.
If you suspect your account has been compromised, please take immediate action:
-
1
Reset - Reset your password to a strong, unique value.
-
2
Strengthen - Verify that 2FA is enabled and remove any unrecognized authentication methods.
-
3
Review & Revoke - Review linked devices and API tokens, revoking anything unfamiliar.
-
4
Communicate - Contact our support team at support@themixbus.com.au for further investigation and account recovery assistance.
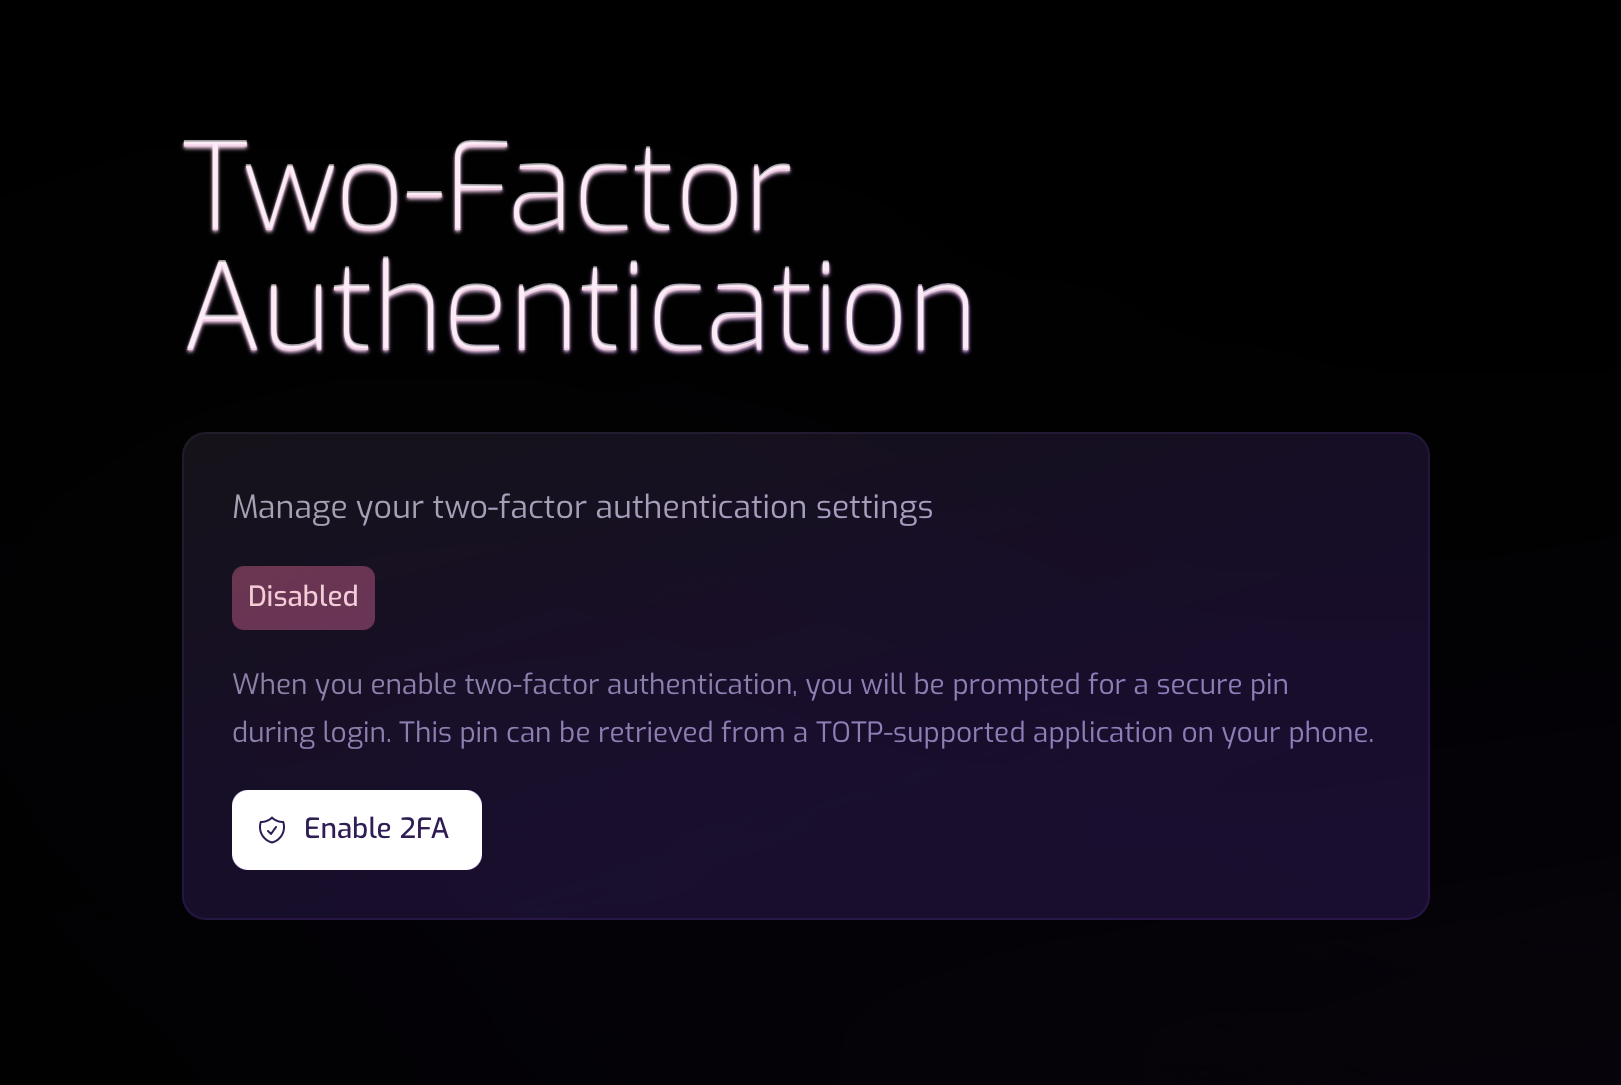
- What is Two-Factor Authentication (2FA)?
Two-factor authentication (2FA) adds a second verification step using a TOTP authenticator app (such as Google Authenticator or 1Password). When enabled, you must enter a six-digit code from your authenticator after your password.
Privacy & Security
Secure Your Account
To keep your account secure, we strongly recommend creating a long, unique password that includes a mix of characters, numbers, and symbols. For extra protection, please enable Two-Factor Authentication (2FA) on your account whenever possible.
By requiring a second verification step such as a 2FA code from an authenticator app, you ensure that even if your password is compromised, unauthorized users should not be able to access your account or media library. Implementing both a strong password and turning on 2FA significantly reduces the risk of account takeover and helps keep your personal information safe.
Enabling 2FA
- 1 Click Enable Two-Factor Authentication
- 2 Scan the QR code with your authenticator app, or copy the manual setup key
- 3 Enter the six-digit code from your authenticator to confirm setup
- 4 Save your recovery codes in a secure location — these are your backup if you lose access to your authenticator
Once enabled, the settings page shows an Enabled badge and a button to disable 2FA if needed. You can view and regenerate recovery codes at any time.
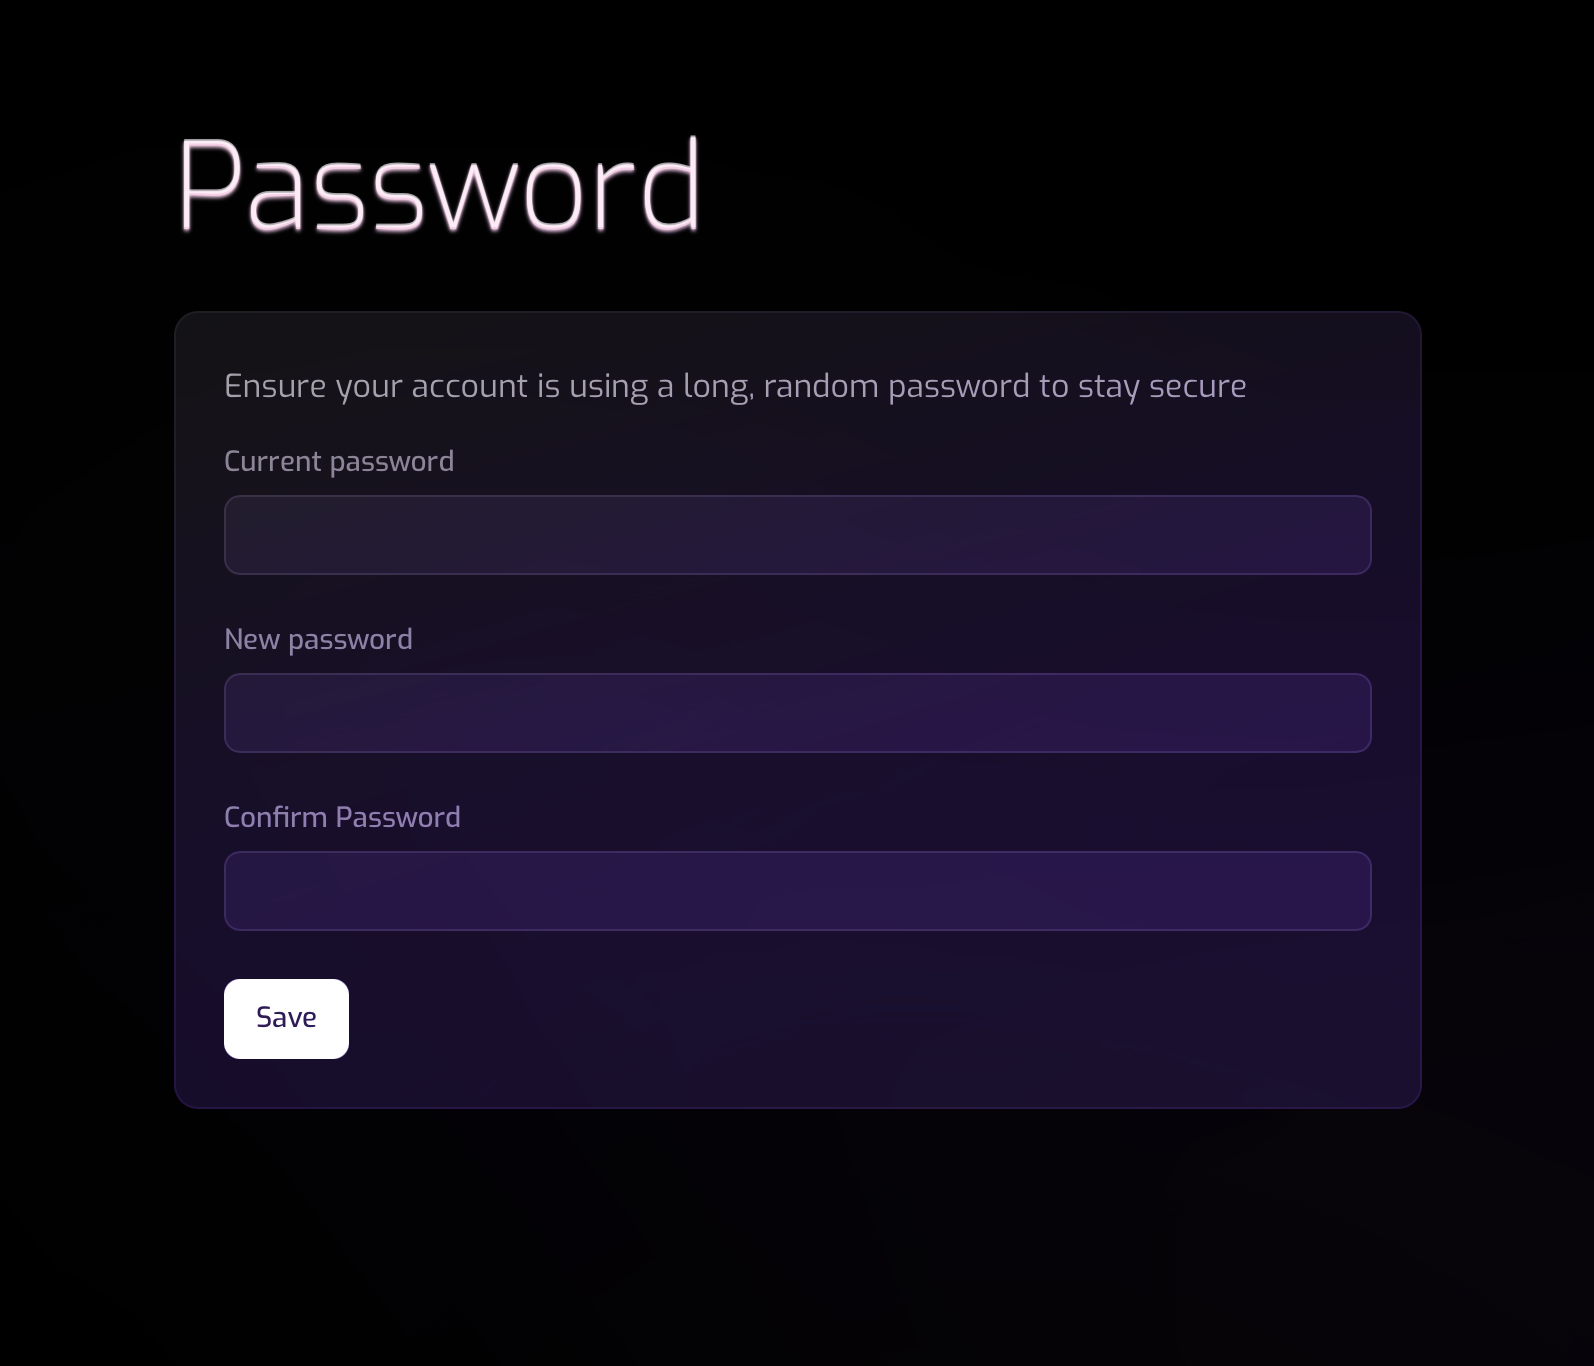
Setting Your Password
- 1 To open your Settings click the Settings link in the WavePlan Folder Drawer.
- 2 Click Settings in the Settings Folder Drawer menu.
- 3 Click Password in the Settings menu.
- 4 Enter your current password in the Current Password field.
- 5 Using a password generator, create a new password and paste it into the New Password field.
- 6 Paste the new password into the Confirm Password field.
- 7 Click Save. If 2FA is enabled, enter the six-digit code from your authenticator to confirm.
Privacy & Security
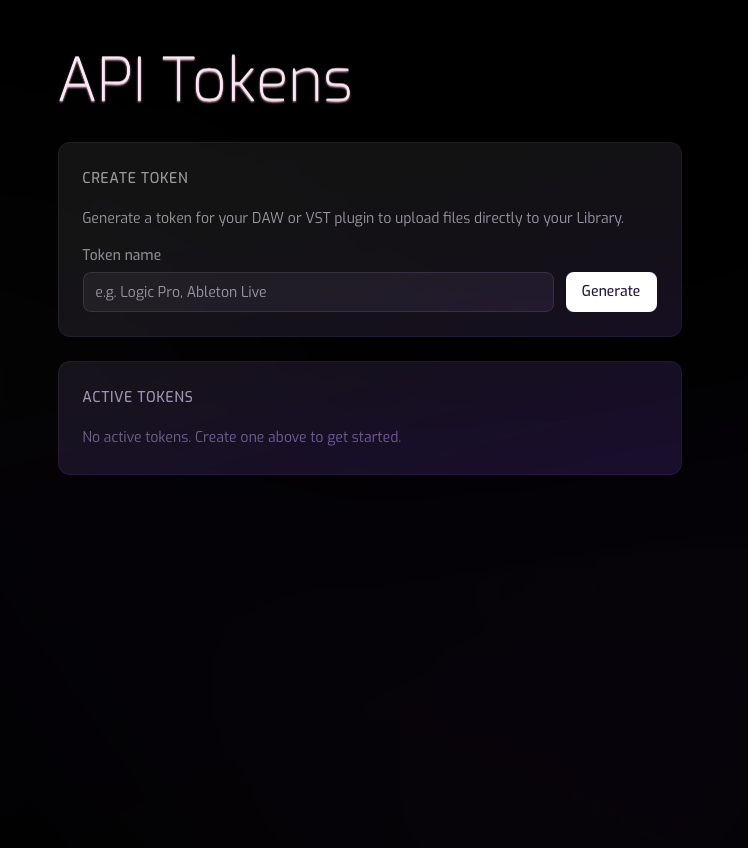
Api Tokens
API tokens can be used to configure 3rd party apps to push audio files to your WavePlan account programmatically.
To generate an API token, go to your WavePlan account settings and click on API Tokens.
- 1 Navigate to Settings. In the Settings Menu Under Privacy & Security click on API Tokens.
- 2 Type a name for your API token and click Generate. This will create a new API token and add it to your active tokens list.
- 3 You can revoke access to a token by clicking Revoke from your active tokens list.
Privacy & Security
Device Linking
Device Linking connects external tools to your WavePlan account with scoped permissions. Supported device types include VST/AU plugins and WaveDrive — each granted only the abilities it needs.
Linked devices appear in your account under Drive → Settings → Device Linking. You can review their granted abilities and revoke access at any time without affecting other devices.
VST / AU Plugin Linking
Linking a WavePlan companion VST/AU plugin to your account allows you to access your music libraries, project plans, and annotations from within your DAW. To link a plugin, open it and click Link Account. You'll be shown a unique device-link code with instructions to complete the pairing. Your libraries and plans are then synchronised across all your devices.
WaveDrive Linking
WaveDrive links to your account during its initial setup. It is registered with device_type: wavedrive and requests three abilities: library:read, library:upload, and library:delete. This enables automatic background sync of audio files from your Mac to your WavePlan library.
See the WaveDrive Device Link documentation for the full list of granted abilities and instructions for revoking access.

Support
Getting Help
If you need assistance with your account, storage, or technical setup, we’re here to help.
We aim to respond to all requests within 24–72 hours. Paid subscribers receive priority support. If you require urgent assistance, upgrading to a paid subscription ensures faster response times.
Email Support
Replies are handled by real humans during Australian business hours (AEST).
In-App Support
In-app support is coming soon. In the meantime, please use email
Documentation
You’re reading it. Use the sidebar to navigate between topics, or scroll through — the active section highlights automatically as you go.